We periodically get questions about how to use the HDD capacity available on the Grid. As it stands today, the only way to reserve HDD space is via a Zero DB (Zdb). While Zdb doesn’t provide the ability to store files out of the box, we do also have a tool called Zero DB Filesystem (Zdbfs) that puts a filesystem interface in front of Zdb storage capacity.
So as promised and without further adieu, here’s a guide on how to store some files on HDD on the ThreeFold Grid.
Prerequisites
- Account funded with TFT
- Basic familiarity with the Dashboard or another way of deploying a Grid VM and connecting via SSH (we will use a micro VM for this guide, and any prepackaged application from the dashboard will work the same)
- A Mac or Linux machine (including WSL) for running tfcmd to create Zdb deployments (this can be a Grid VM—see the caveat below)
Regarding item 3, using tfcmd on any system currently requires storing the seed phrase used to make the deployments to disk. This means that if you use a Grid VM, the seed phrase will get stored to the disk of the node and it’s possible that the farmer could recover it.
Before you enter your seed phrase anywhere, please assess the risk. If you have a node, using a VM on your own node to deploy the Zdbs would be a safe option, even if you’re not using your node in the final deployment. Otherwise, if you are taking this path, choose a node from a farmer you can trust.
Last thing I’ll say on this: if you’re a Windows user and haven’t already, consider getting set up with WSL. It’s a rather slick way to bootstrap a Linux environment that you can use to do lots of fun stuff with ThreeFold technology and beyond.
Let’s go
Alright, if you’re still with me, great. I’ll try to scare you off too in the following sections 
The first thing we need to do is plan our deployment. For best results, we need a node that has HDD space available and also that has IPv6 enabled. We don’t need to use IPv6 outside the deployment, but for now it provides the best way to connect to the Zdbs.
You can find appropriate nodes using the node finder in the Dashboard. IPv6 connectivity can be deduced by looking in the Interface Details section:
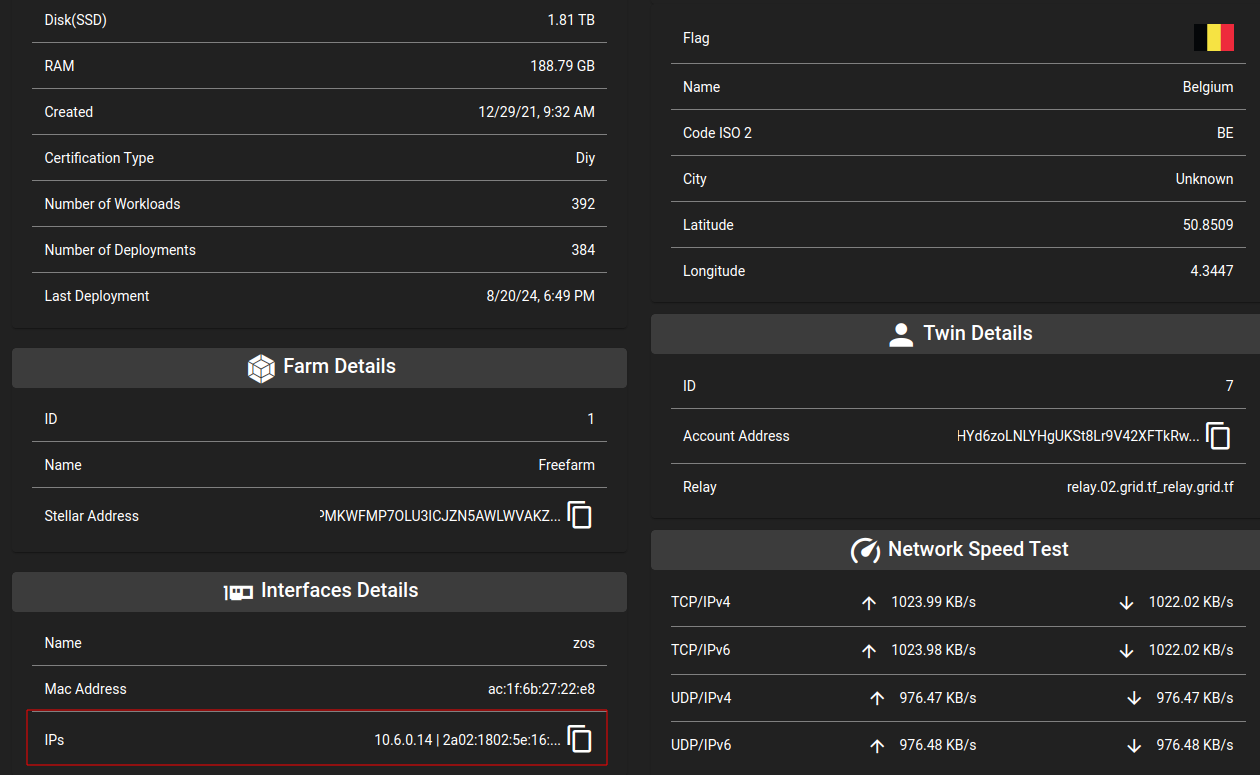
Here we can see there’s both a LAN IPv4 address and an IPv6 address separated by a pipe character. IPv4 only nodes will only have an IPv4 address here.
Deploy the VM
I won’t cover the VM deployment in detail. You can choose whatever method works for you to connect to the VM over SSH. Wireguard is a popular and reliable cross platform option.
Remember that I’m covering the steps specifically for a micro VM using Zinit. That includes the micro VM deployments from the Dashboard and all of our prepackaged application images.
Deploy the Zdbs
Now let’s deploy the Zdbs. For this we’ll use tfcmd, which is released with our Go SDK. You could also use Terraform at this step, but I won’t cover that.
Install and login to tfcmd before proceeding. The steps are covered in the manual.
We will deploy three separate Zdbs, as required by Zdbfs. We need a strong password for these Zdbfs. You could use a password manager, for example, to generate a strong random password of at least twelve characters.
Here’s another way to generate a random password from a Linux command line (this generates 25 characters):
openssl rand -base64 18
The three Zdbs for Zdbfs are used for data, metadata, and temporary storage. You can name them anything you want, but using a name related to their function will help keep things organized. For the metadata and temp Zdbs, 1gb of storage is fine (that’s the minimum tfcmd can deploy). The size of the data Zdb determines the capacity you’ll have available to store files, so choose that according to your needs.
Here are example invocations of tfcmd. Here we deploy to node 1 with a data size of 10gb Remember to replace the node id with the node your VM is running on, and again, use a strong random password:
tfcmd deploy zdb --mode seq --node 1 -n meta --size 1 --password "password"
tfcmd deploy zdb --mode seq --node 1 -n temp --size 1 --password "password"
tfcmd deploy zdb --mode seq --node 1 -n data --size 10 --password "password"
Once the deployments are complete, get the info for each one:
tfcmd get zdb meta
tfcmd get zdb temp
tfcmd get zdb data
Here’s an example output, trimmed to just show the relevant section:
	"Zdbs": [
		{
			"name": "meta0",
			"password": "abc123",
			"public": false,
			"size": 1,
			"description": "",
			"mode": "seq",
			"ips": [
				"2a02:1802:5e:0:c11:7dff:fe8e:83bb", <--
				"300:1b0f:ec2d:be82:a2b6:7aca:1083:6c1",
				"5f0:1801:a90b:3841:8eb6:277c:1bb5:c5e0"
			],
			"port": 9900,
			"namespace": "18-622157-meta0" <--
		}
	]
I’ve added arrows pointing to the important parts. The first IP address in the list is the IPv6 address, and that’s the one we want. The IP is generally the same for all Zdbs on the same node (assuming they are on the same disk). But the namespaces will all be different, based on the names you gave before.
We’ll use these in the next section.
Install Zdbfs
Next we’ll install the Zdbfs binary into the VM that will mount the filesystem. Normally you’d want to grab the latest release from the official repo. In this case, we’ll use a release from my fork that has a couple of small fixes:
wget -O /usr/local/bin/zdbfs https://github.com/scottyeager/0-db-fs/releases/download/v0.12.0/zdbfs-0.1.12-syfork-amd64-linux-static
chmod +x /usr/local/bin/zdbfs
zdbfs -V
If you see Zdbfs print its version info, then the install was successful.
Choose mount point
You can mount your Zdbfs on any valid path that doesn’t interfere with the rest of the system. If you’re not sure, then follow along with the example. First, we need to make sure the path exists:
mkdir /mnt/zdbfs
Create Zinit service
For this step, we’ll need a text editor. Micro VMs don’t come with one installed, so go ahead and install your favorite CLI editor now:
apt update && apt install -y nano
Now create the Zinit service file:
nano /etc/zinit/zdbfs.yaml
Here’s a template to copy and paste:
exec: |
  bash -c '
    /usr/local/bin/zdbfs \
    -o host=<IP-address> \
    -o port=9900 \
    -o mn=<meta-ns> \
    -o dn=<data-ns> \
    -o tn=<temp-ns> \
    -o ms=$PASSWORD \
    -o ds=$PASSWORD \
    -o ts=$PASSWORD \
    -o size=10737418240 \
    /mnt/zdbfs
  '
env:
  PASSWORD: <password>
You’ll need to edit this template and fill in your own values anywhere you see angle brackets. Reference the example below to see how it should look when you fill in the values.
There are also two optional changes you can make:
- Set the display size of the filesystem by changing the
sizeoption. Ideally this should match the size of your data Zdb. The size is given in byte, so multiply the number of gigabytes you reserved by 1073741824. The example above shows 10g - Change the mount point by replacing
/mnt/zdbfswith your own choice of mount point
To find the needed info on the Zdbs you deployed before, reference the outputs of your tfcmd get commands from before.
Here’s an example of how to start filling in the values, based on the example tfcmd output from before:
exec: |
  bash -c '
    /usr/local/bin/zdbfs \
    -o host=2a02:1802:5e:0:c11:7dff:fe8e:83bb \
    -o port=9900 \
    -o mn=18-622157-meta0 \
    -o dn=<data-ns> \
    -o tn=<temp-ns> \
    -o ms=$PASSWORD \
    -o ds=$PASSWORD \
    -o ts=$PASSWORD \
    -o size=10737418240 \
    /mnt/zdbfs
  '
env:
  PASSWORD: abc123
Continue by also filling in the namespace values from the data and temp namespaces. Then you can save the yaml file and exit the text editor.
Start Zdbfs
The last step is to start up the Zdbfs service. You only need to do this once. From here on, Zinit will ensure that Zdbfs is always running, even if the VM reboots for any reason. The monitor command instructs Zinit to look for a yaml file with the provided name and start up the service:
zinit monitor zdbfs
You can quickly check for any issues like this:
zinit

# zdbfs: Success
If there was any error starting Zdbfs, that would be shown instead. You can check the logs for any clues like this:
zinit log zdbfs
A final check that everything is working properly is to run df:
df -h

# Filesystem      Size  Used Avail Use% Mounted on
# zdbfs            10G  1.0K   10G   1% /mnt/zdbfs
Now you can start reading and writing files to the mount point, and they will be stored on HDD in your Zdb.
Final thoughts
While this isn’t the most straightforward process, I hope that this guide was able to get you started with using ThreeFold HDD capacity in a relatively simple way. If you had any trouble, please leave a reply below and I’ll do my best to help.
Cheers