
Hey everybody,
I was asked to give a demo recently of running WordPress on the ThreeFold Grid. This has been covered a couple times in different ways already, using Caprover and also in the video @FLnelson shared here. The following guide will show a bit different approach, presented in written form.
Like Nelson’s video, we’ll use Docker Compose to manage the services. The docker-compose.yaml file I’ll show below is copied directly from programonaut.com, so kudos and thanks go to the author. We’ll use a ThreeFold full VM with public IP and a free SSL certificate from Let’s Encrypt. For demonstration purposes, I’ll also link a free domain from Duck DNS, but you can just as well use your own domain managed by any registrar.
Prerequisites
Here’s what you’ll need before working through this guide:
- SSH client and key pair (see the guides here for all platforms)
- ThreeFold Playground profile configured with your SSH public key and loaded with TFT
- Optionally, a domain to point at your WordPress site
Deploy the VM
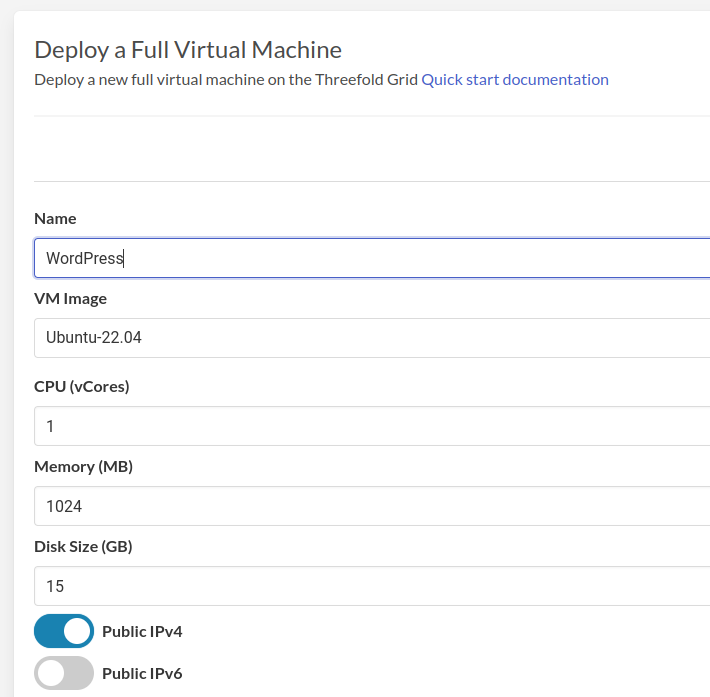
I won’t cover the deployment process in too much detail. You can find more info in the manual if you require it. Here’s what I suggest for minimum specs:
- Full VM running Ubuntu
- 1 CPU core
- 1GB of RAM
- 15GB disk (the minimum allowed by the Playground)
- Public IPv4
If your site gets a lot of traffic, you might need more capacity. There are other approaches to scaling like using a CDN, too, but I won’t cover that here.
So for example:
Point the DNS
After the VM finishes deploying, it would be a good time to do your DNS setup. Sometimes DNS changes can take a bit of time to propagate, and we’ll need it working before we can get our SSL certificate.
If you’re using Duck DNS, login with one of the sign in methods, then add a domain:

Now enter the public IPv4 address you saw when your deployment finished in the Playground and hit update ip:

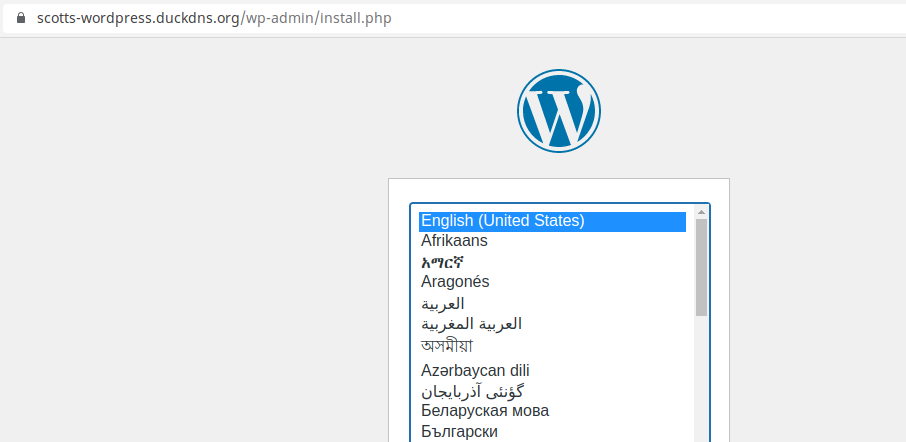
Now I’ve got the domain scotts-wordpress.duckdns.org pointing to the IP 185.206.122.138.
If you want to use your own top level domain, you’ll need to setup an A record and maybe also a CNAME if you want to cover both the “root” and “www” versions of your domain. Check with your domain registrar for more info about how to do this.
Docker setup
Next, login to the VM with SSH and install Docker. I like to use the Docker install script to get a newer version than what’s available in the Ubuntu repositories:
wget get.docker.com -O- | sh
Once the install is complete, create a docker-compose.yaml file with these contents. You can use any text editor you like and place the file anywhere that you want. For example:
nano docker-compose.yaml
Note that there are three places where you need to substitute your own information: VIRTUAL_HOST, LETSENCRYPT_HOST, and DEFAULT_EMAIL. Replace the example values shown below with your own domain and email address:
services:
    website:
        image: wordpress
        container_name: website
        volumes:
            - ./website:/var/www/html
        environment:
            WORDPRESS_DB_HOST: website-db:3306
            WORDPRESS_DB_USER: website
            WORDPRESS_DB_PASSWORD: password
            WORDPRESS_DB_NAME: website
            VIRTUAL_HOST: your-domain.com
            LETSENCRYPT_HOST: your-domain.com
        depends_on:
            - website-db
        restart: unless-stopped

    website-db:
        image: mariadb
        container_name: website-db
        volumes:
            - ./website-db:/var/lib/mysql
        environment:
            MYSQL_ROOT_PASSWORD: rootpassword
            MYSQL_DATABASE: website
            MYSQL_USER: website
            MYSQL_PASSWORD: password
        restart: unless-stopped

    nginx:
        container_name: nginx
        image: nginxproxy/nginx-proxy
        restart: unless-stopped
        ports:
            - 80:80
            - 443:443
        volumes:
            - /var/run/docker.sock:/tmp/docker.sock:ro
            - /var/docker/nginx/html:/usr/share/nginx/html
            - /var/docker/nginx/certs:/etc/nginx/certs
            - /var/docker/nginx/vhost:/etc/nginx/vhost.d
        logging:
            options:
                max-size: "10m"
                max-file: "3"

  acme-companion:
    container_name: acme-companion
    image: nginxproxy/acme-companion
        restart: unless-stopped
        volumes_from:
            - nginx
        volumes:
            - /var/run/docker.sock:/var/run/docker.sock
            - /var/docker/nginx/acme:/etc/acme.sh
        environment:
            DEFAULT_EMAIL: your@email.here
Intermezzo
In case you’re wondering, these container images are either provided directly by Docker as official images or come from projects sponsored by Docker. They’ve all been downloaded millions of times and are probably trustworthy. That said, please be aware of what you’re doing here and always think twice about where the code you’re running is coming from.
Launch
With that out of the way, we can bring up our deployment:
docker compose up
This way, you’ll see the log output on the screen in real time. You’ll need to wait a little bit on the first run for the SSL certificate to get generated and some other setup. Once that’s all finished, new output will stop appearing on the screen. Enter your domain into your web browser to test if it’s ready.
You should eventually get to the WordPress install screen:
Okay, nice! For the final touch, let’s return to our terminal. We’ll stop the deployment by hitting ctl-c. Then we can start it again in the background, so there’s no interruption when we disconnect the SSH client:
docker compose up -d
Troubleshooting
One tip here, in case something goes wrong and you get stuck, it that you can reset the deployment with this:
docker compose down
docker compose up
That will destroy and recreate all the containers, but all the data will be intact. You can also take it a step further and do a full reset of all data by adding -v:
docker compose down -v
Be careful with that one, because it can erase your entire site! I had one case where there was an issue in the initial setup and doing this helped. Of course, once you’ve started using your side, you would probably want to look for a different solution first.
In any case, I highly recommend backing up your site’s data somewhere you can trust (maybe a guide on this will be coming soon  ).
).
Publish
From here you’re in the capable hands of all the docs and guides out there on how to use WordPress.
One thing that this method can’t do is send email directly for things like password resets. You can still reset the password other ways, like using the functions.php file. That and the other php files you might want to edit for admin of your site will be found under the docker volume location:
/var/lib/docker/volumes/root_wordpress/_data/
Aside from that, this should be a pretty standard “self hosted” WordPress setup. Happy publishing!