
Note: The TF Playground now has an Umbrel weblet. Read more here: https://manual.grid.tf/playground/umbrel.html
Hey everybody,
I got inspired by Drew’s work on Umbrel to try creating a micro VM image that would help simplify deployment. If you’re curious about how I did that, there’s a comprehensive video coming soon, so stay tuned. Here, I just want to run through how to deploy the image for yourself.
Nice benefits of this method:
- Can deploy in the Playground
- Integrated Tailscale networking makes getting a private network to the Umbrel
- Umbrel is already installed in the VM, no SSH required
With that, let’s get to it.
Tailscale
While it’s not necessary to use Tailscale, I recommend that you do. It’s the easiest way to get a secure setup, and I won’t cover what might be necessary to secure your deployment if it’s reachable over the public internet or Planetary Network. The free plan is totally sufficient for our uses, and the only real downside is that you’ll need one of a few big tech accounts to login.
You’ll need to install Tailscale on at least one computer that you plan to use to reach the Umbrel deployment. Tailscale also works on mobile devices.
- Visit the Tailscale download page and follow the install instructions for your environment
- Go to the keys page in settings
- Hit the
Generate auth keybutton (enable reusable to save some hassle if you need to redeploy) - Press
Generate keyand copy the key that pops up (tskey-auth-...)
These keys are good for a maximum of 90 days. After that, you’ll need to generate a new one and replace the old one.
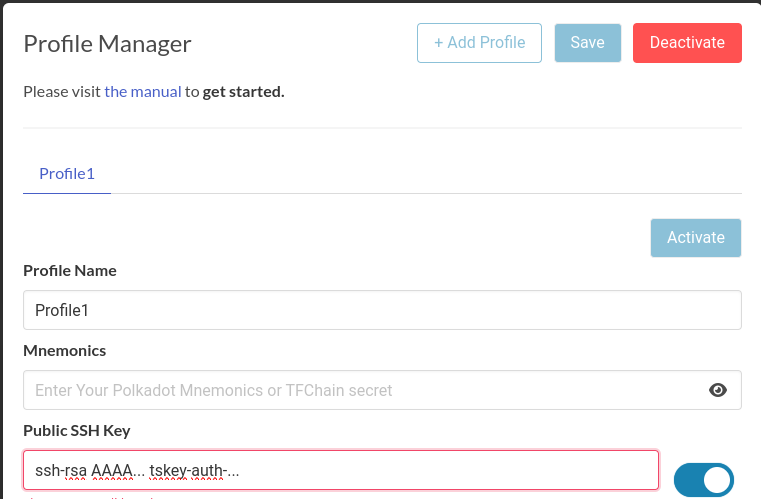
Playground Profile
I’ll assume here that you already have a profile in the ThreeFold deployment Playground. What we’re going to do next is save the Tailscale auth key into our Playground profile. We’ll do this by setting it as the “comment” in our SSH key.
A typical public SSH key looks like this:
ssh-rsa AAAA... user@host
That last part user@host is the comment. It might have a different format or be missing altogether. What’s important is that we end up with three strings of text separated by spaces, replacing any comment with the Tailscale key:
ssh-rsa AAAA... tskey-auth-...
The SSH server doesn’t care about the comment, so we’re using this as a hack to save our Tailscale key in the Playground and pass it into the VM. I’ve included a script in the VM that will extract this and pass it to Tailscale to authenticate the VM into your Tailscale network.
Save this in your profile, then hit Save and Activate:
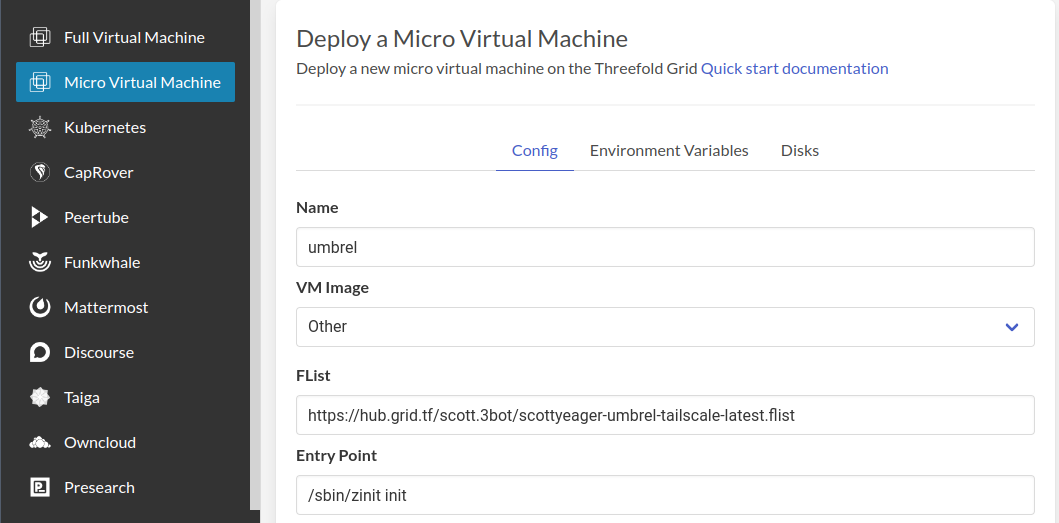
Deploy
With that done, we can now deploy our VM. Select Micro Virtual Machine from the left side bar. We’ll need to set the VM Image to Other and fill in the link to the Umbrel flist. Fill in the entry point too as shown below:
- Name:
umbrel(or whatever you choose, up to you) - FList: https://hub.grid.tf/scott.3bot/scottyeager-umbrel-tailscale-latest.flist
- Entry Point:
sbin/zinit init
In terms of system specs, Umbrel recommends at least:
- A dual core CPU (I think that would mean 4 vcores/threads)
- 2GB of RAM
Depending on which apps you want to run, you might need more. The default root filesystem size of 2GB for a VM with these specs will be fine here.
Since we’re using Tailscale for network, we can disable all the network options, and that’s what I recommend for best security:
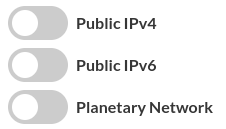
Note here: the Playground will disable the deployment button when all network options are disabled (for now—I have an issue open to change this). However, there’s a work around: press enter on your keyboard, and then when the dialog pops up, hit cancel. The deployment will proceed from there.
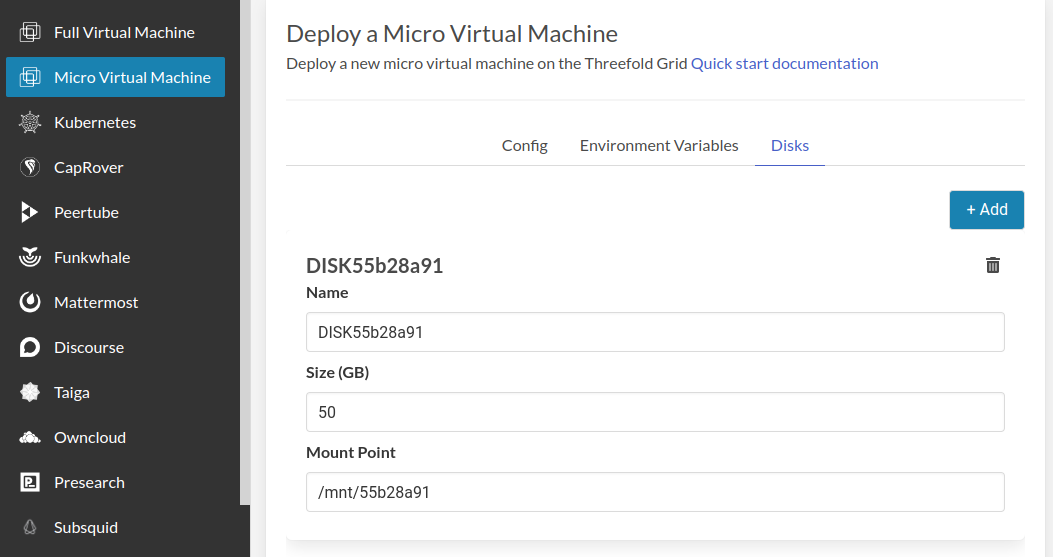
Add a disk (required)
For this image, we need to attach a disk, and all data for Umbrel apps will be stored on the disk. The disk is not optional, Umbrel won’t work without it.
Attach your disk on the disk tab. Just leave the name and mount point as is (if you get creative here, just make sure your disk is mounted under /mnt or the scripts in the image won’t find it):
Pick a node
You can choose any node you want that has enough capacity available. One cool feature of Tailscale is that it can directly connect you to workloads running on your own nodes in your own network, without needing to pass the traffic through any public node or gateway, via the magic of NAT traversal. There’s some good reading on the Tailscale site if you want to know more about how this works.
With everything completed, hit Deploy and wait a bit for the node to download and spin up the VM image for you.
Connect
Once the deployment is complete, you should be able to connect to it nearly right away, although it could take some additional time if the node has a slower connection. Another cool feature of Tailscale is the Magic DNS. If that’s working and you named your VM umbrel, you should be able to use this link in your browser to reach it:
Otherwise, check your Tailscale admin console, copy the IP address for the VM and put that into your browser. Now you can create your account on the Umbrel and start to use it.
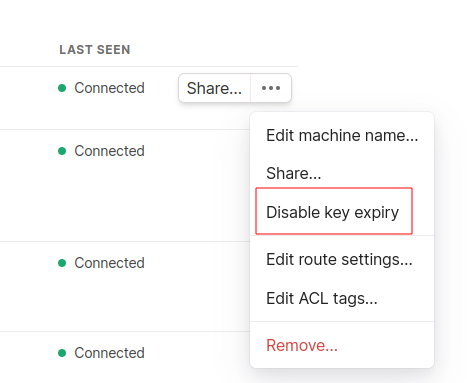
Disable Key Expiry
By default, device keys expire after 180 days and the devices need to reauthenticate. That would disconnect it from our private network and render the VM useless without another way to connect. We can disable key expiry to prevent this from happening. Make sure to do this or you might need to redeploy after 180 days.
Back in the Tailscale admin page, you should see the VM has been added under Machines. If you mouse over it and click the ellipsis on the right side (…), there’s an option to disable key expiry. Click this:
Relays vs direct connections
I mentioned before that Tailscale will attempt to connect you directly to your VM. If that fails, the traffic will be routed over Tailscale’s relays (end to end encrypted) and performance might not be great. You can check by running this in a terminal (on any platform, I believe):
tailscale status
You’ll see the name of your VM and either direct or relay. There are some tips for how to configure the firewall on your computer to get a direct connection working, in the Tailscale docs.
Wrapping up
I hope you found this guide and the Umbrel micro VM image useful. Let me know how your experience was and if any questions came up for you along the way.
