
Lately I’ve been playing with packaging Tailscale inside of micro VM images to provide another networking option out of the box on the Grid. After posting on how to Deploy Umbrel with Micro VM Image and Tailscale, I wanted to follow up with a generic Ubuntu image with Tailscale and show how it can really simplify the process of connecting over SSH.
Intro to Tailscale
TLDR: Connect to your workloads without needing a public IP or Planetary Network. SSH in from the browser. Super simple.
In case you’re new to Tailscale, it’s a system for forming private networks that are based on Wireguard. It allows for direct peer to peer connections between basically any device with zero configuration regardless of network conditions like NAT and firewalls, by simply installing and starting up a client.
For those who are curious, Tailscale’s client software is open source, but it relies on closed source coordinating servers operated by a central organization, by default. All traffic is end to end encrypted, and there’s a nice free plan that supports up to 20 devices. There’s also an independent project called Headscale that develops an alternative open source coordinating server you can self host (I haven’t tested or provided support for this in the image yet).
You might be wondering how this compares to the Wireguard networks that are built into the Grid. One major difference is that Grid Znets always rely on a public node to route traffic, whereas Tailscale can enable devices to connect directly. This is especially interesting if you have 3nodes in your local network and want to connect to your workloads without routing your traffic elsewhere. Tailscale also has some very neat features like Magic DNS and an in browser SSH client.
Furthermore, Wireguard access on the Grid is only available through Terraform right now, whereas we can get our Tailscale image working in the Playground.
Tailscale Setup
To reach your VM after deployment, you’ll need to install the Tailscale client on your local device. Actually, this isn’t strictly necessary if all you plan to use is the in browser SSH, so there could be some use cases where you can skip the first step:
- Visit the Tailscale download page and follow the install instructions for your environment
- Go to the keys page in settings
- Hit the
Generate auth keybutton (enable reusable) - Press
Generate keyand copy the key that pops up (tskey-auth-...)
These keys are good for a maximum of 90 days. After that, you’ll need to generate a new one and replace the old one.
Playground Profile
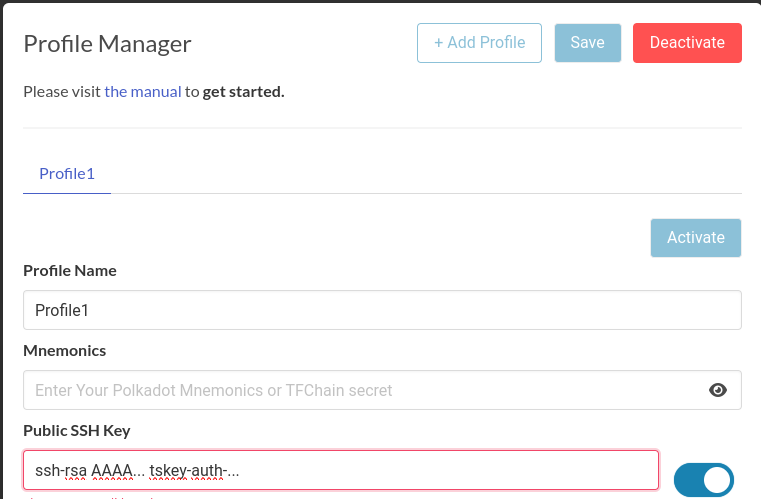
I’ll assume here that you already have a profile in the ThreeFold deployment Playground. What we’re going to do next is save the Tailscale auth key into our Playground profile. We’ll do this by setting it as the “comment” in our SSH key.
A typical public SSH key looks like this:
ssh-rsa AAAA... user@host
That last part user@host is the comment. It might have a different format or be missing altogether. What’s important is that we end up with three strings of text separated by spaces, replacing any comment with the Tailscale key:
ssh-rsa AAAA... tskey-auth-...
The SSH server doesn’t care about the comment, so we’re using this as a hack to save our Tailscale key in the Playground and pass it into the VM. I’ve included a script in the VM that will extract this and pass it to Tailscale to authenticate the VM into your Tailscale network.
Save this in your profile, then hit Save and Activate :
Deploy
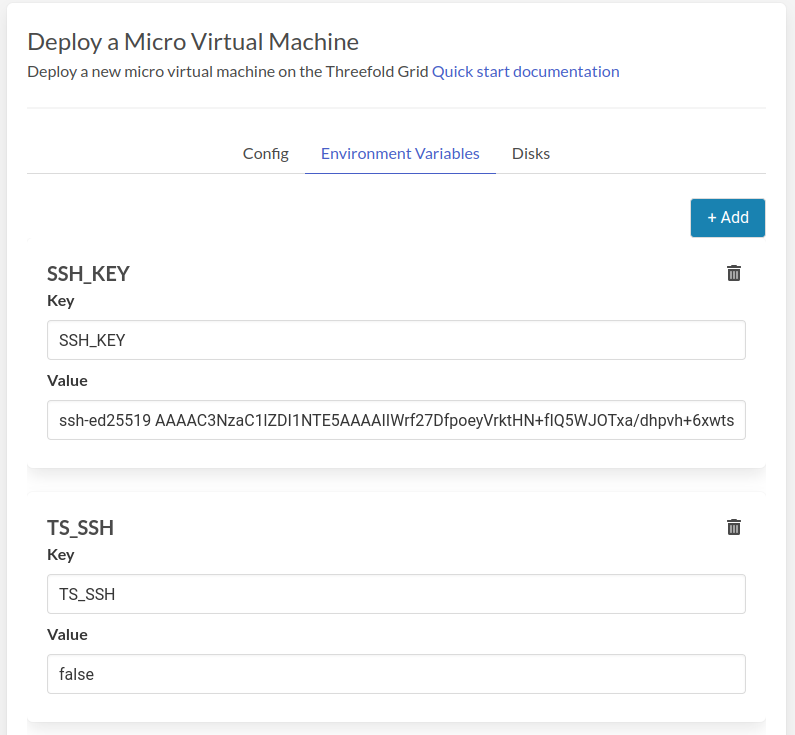
With that done, we can now deploy our VM. Select Micro Virtual Machine from the left side bar. We’ll need to set the VM Image to Other and fill in the link to the Ubuntu 22.10 Tailscale flist. Fill in the entry point too as shown below:
- Name: If you set something nice, can use with Magic DNS later
- FList: https://hub.grid.tf/scott.3bot/scottyeager-ubuntu-tailscale-22.10.flist
-
Entry Point:
sbin/zinit init
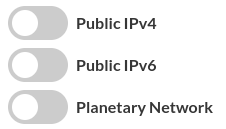
Go ahead and fill in the VM specs according to your needs. Since Tailscale will handle the networking, we don’t need to tick any of the network boxes 
Optional SSH Config
By default, this image enables Tailscale SSH. That’s necessary to enable the in browser SSH, but it has a side effect for other SSH clients that you might not like. When connecting over SSH, only using the Tailscale IP, you’ll need to authenticate the session in a browser window. If you don’t want to use the in browser SSH and also don’t want to be bugged to reauthenticate, you can disable the feature by setting the environment variable TS_SSH=false, like this:
When you’re ready, hit Deploy and wait for deployment to finish.
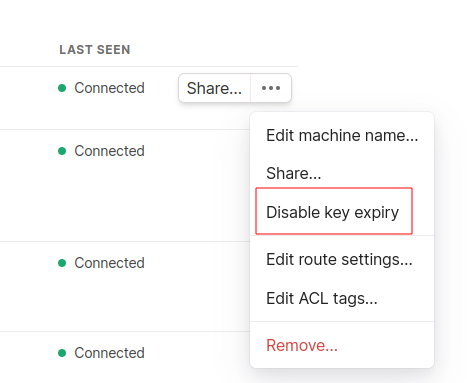
Disable Key Expiry
By default, device keys expire after 180 days and the devices need to reauthenticate. That would disconnect it from our private network and render the VM useless without another way to connect. We can disable key expiry to prevent this from happening. Make sure to do this or you might need to redeploy after 180 days.
Back in the Tailscale admin page, you should see the VM has been added under Machines. If you mouse over it and click the ellipsis on the right side (…), there’s an option to disable key expiry. Click this:
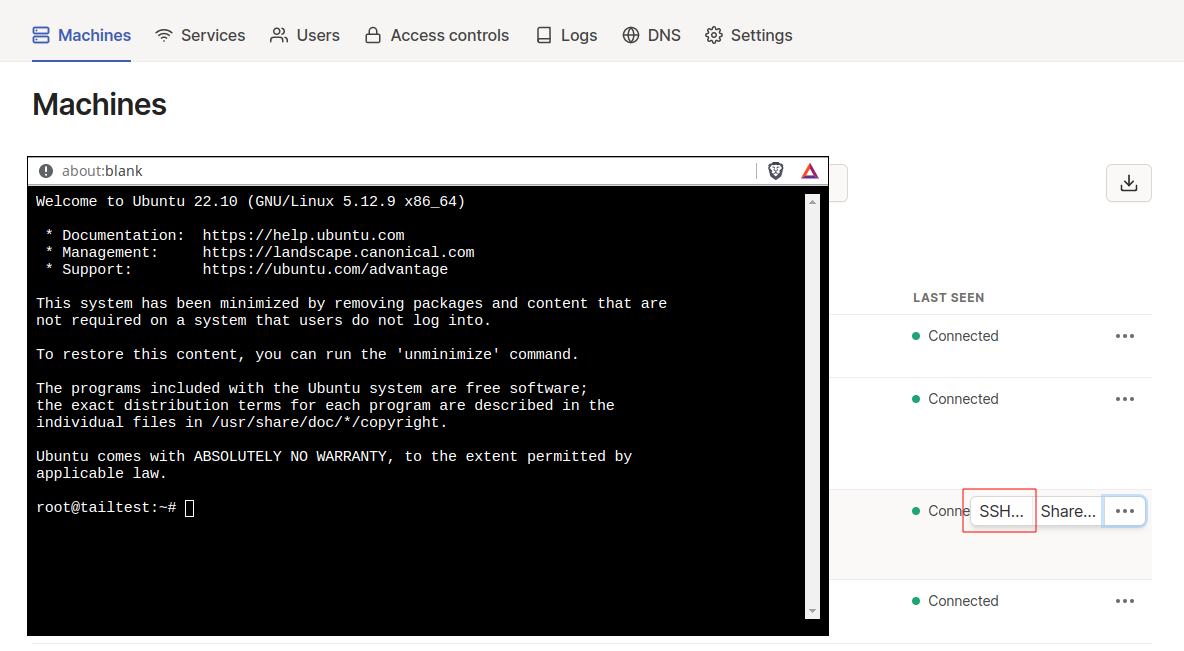
In Browser SSH
The VM should also have a green SSH tag on it. You might have already noticed the SSH button, also on the right side. Click that, select root as your user, and the browser based SSH window will pop up. Cool!
Relays vs direct connections
I mentioned before that Tailscale will attempt to connect you directly to your VM. If that fails, the traffic will be routed over Tailscale’s relays (end to end encrypted) and performance might not be great. I found that my browser based SSH connections always went over a relay, and that’s perfectly adequate for moving text around.
For connections besides the in browser SSH, you can check if a relay is in use by running this command in a terminal (on any platform, I believe):
tailscale status
You’ll see the name of your VM (or your local machine if you run it in the VM) and either direct or relay. There are some tips for how to configure the firewall on your computer to get a direct connection working, in the Tailscale docs.
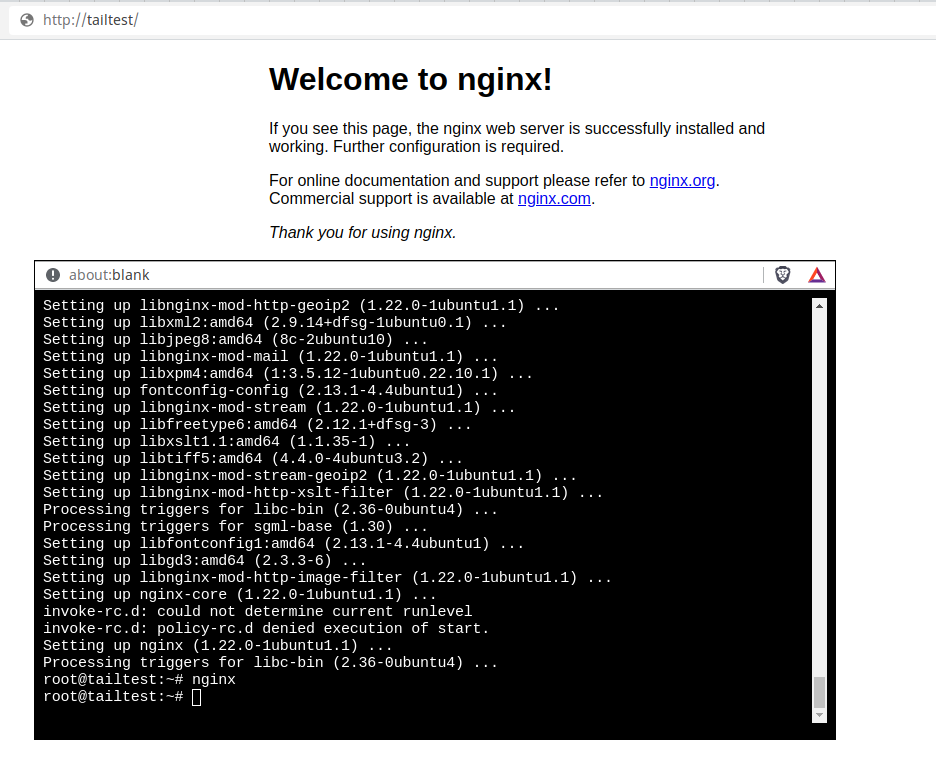
Magic DNS
I can also use the host name that I assigned to the VM at deployment time along with Tailscale’s Magic DNS feature to connect to the VM. For example:
ssh root@tailtest
Here, I’ve installed and started up web server inside the VM, then used the host name in my browser to pull it up:
Wrapping up
By releasing this micro VM image, I hope to make it super simple for anyone to connect to their VM on the Grid by SSH. Tailscale has more features that I haven’t tested or covered in this post. One cool one is the ability to allow other Tailscale users to connect to a device by generating a link and sharing it with them. That would be a great way to operate a game server, for example, or other shared service, without needing to worry about firewall configs or port forwarding.
From here, I’m thinking about working on a full VM image that integrates Tailscale in the same way. There are also similar services like ZeroTier that some folks might already use and prefer. I’d be happy to hear any suggestions for future images. If you’re curious about how I built this image, just let me know and I can provide details (I’ll publish the source on Github later).
Thanks for stopping by and have fun with your deployments 
