
Note: Now available on the TF Manual: https://manual.grid.tf/getstarted/ssh_guide/ssh_putty.html
Especially if you’re running Windows, you might want to use Putty to connect to your Grid VMs. This is possible, but the public key must be imported into your profile with care for this to work. Here’s a quick step by step:
Putty Version
For best results, make sure you have the latest version of Putty. Older versions of Putty before 0.75 don’t support the newer SHA-2 based form of RSA authentication and therefore RSA keys won’t work
with the latest versions of popular Linux distributions, by default.
PuttyGen
First run PuttyGen. Even if you already have a key you want to use, this is the best way to get the public key in the proper format. If you don’t already have a key, choose RSA and hit generate. When you’re done, hit Save private key and write the .ppk file to disk. We’ll use this file in the next step to connect.
If you already had a key or want to return to this step later, hit the Load button and select the ppk file. At the top of the PuttyGen window, you’ll see a field with the public key:
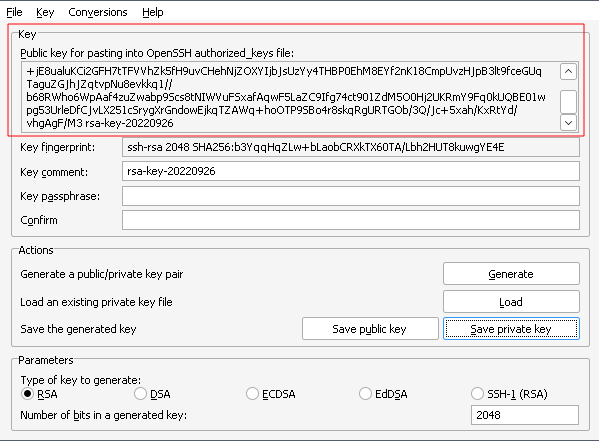
Copy the public key from this window, making sure you get everything between ssh-rsa and the key comment rsa-key... in this case. Paste that into the ssh public key field in the playground or Terraform file for your deployment. In case of the playground, also save your profile after doing this.
Copying and pasting the public key from your ppk file will not work. There are line breaks in the file that get interpreted as extra information when they get passed to the VM. You might have success removing the line breaks manually, but copying the public key from this gui window is the simplest and most reliable way to make this work.
Connect with Putty
After you’ve added the key to your playground profile or Terraform file, create your deployment. There’s no way to change the SSH key in an existing deployment, you must delete and redeploy. Copy the IP address once the deployment is successful and then open Putty.
In Putty’s config screen, navigate to Connection > SSH > Auth:
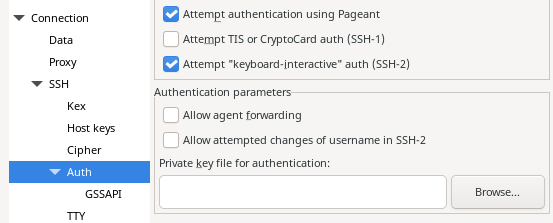
Hit Browse… and select your ppk file. Then go to Session at the top of the left nav bar and enter your VMs IP address in the Host Name (or IP address) field. Then hit the Open button at the bottom of the window to start your session. When you are prompted for a user name, enter root and you should then get access to a terminal with no password prompt.
If you’re prompted for a password, something went wrong and you won’t be able to log in. Go back and check the steps above, then feel free to post questions or problems in this thread.

 there’s a wsl aswell in the video gallery update I just shipped