
Since the introduction of full virtual machines on the Grid, it’s also possible to run cloud images. This opens the possibility to create custom cloud images. If it can run on Linux, you can add it to a cloud image and in turn deploy it on the Grid!
The following is not the way to do it, just what I found to be practical and easiest. If you have alternatives or other ways to do things, please share!
Requirements:
- A hypervisor (KVM, Virtualbox, …): we will create a temporary vm to manipulate the image
- virt-customize and qemu-img (
apt install libguestfs-tools qemu-utils) - Some basic Linux knowledge
Prep image
First download your preferred cloud image, in this example we use Ubuntu 20.04.
wget https://cloud-images.ubuntu.com/focal/current/focal-server-cloudimg-amd64.img
A standard Ubuntu cloud image is 2.1GB in size. If you require more for the software you will add later on, use qemu-img to resize the partition of the image. Set the size you want to add (not the total size) at the end of the cmd. Here we will add 1GB to the image.
Remember that it’s important to keep your image as small as possible. Since for each deployment, the image has to be copied from the Hub to the ZOS node. The bigger it is, the longer it takes.
qemu-img resize focal-server-cloudimg-amd64.img +1G
We must set a root password, otherwise we can’t login to the VM console for setting up our image.
virt-customize -a ubuntu-20-04-amd64.img --root-password password:somepassword
Temporary VM to resize filesystem
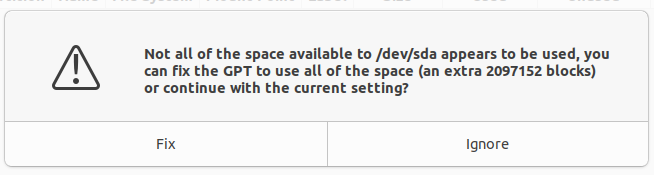
Next up is to expand the file system on the cloud image. We expanded the partition previously, to use the new space we must also expand the file system. For this I used a temporary VM to which I attach an Ubuntu desktop ISO and the cloud image. Boot into Ubuntu desktop and start GParted. It will ask if GPT can use the free space, press ‘Fix’.
Select the cloud image (the ext4 partition), right click it and choose ‘Resize/Move’.

Move the used ‘partition space bar’ to the right to expand the file system.
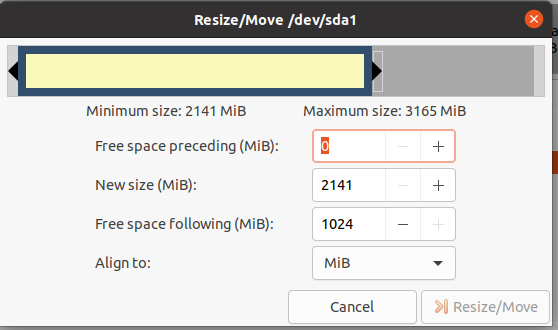 ->
-> 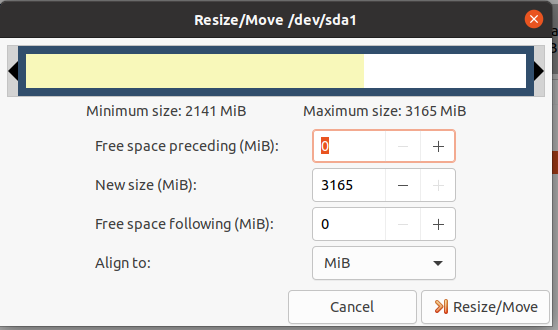
Then press ‘Resize/Move’, next the green check mark to apply the changes, confirm with ‘Apply’

This will expand the partition and you can shut down the VM again.
Temporary VM to add your custom software
Next will be to start another vm with the cloud image as it’s root disk, so to boot the cloud image itself. Once the image is booted you can choose to install your software via the VM console, or enable SSH inside the VM to install remotely. I always use SSH since you need networking to download your software anyway. For this, make sure to connect the VM to a network (with DHCP, is easiest).
Open the console of your VM, login with username root and the password you set previously. Once logged in enable networking and SSH.
ip a
dhclient enp1s0
ip a
ssh-keygen -A
mkdir -p /run/sshd
Edit /etc/ssh/sshd_config so these settings are set. It’s also easy to make a backup of the original sshd_config file since we have to change it back at the end (so to not enable passwor auth in sshd once the image is deployed on the grid):
PermitRootLogin yes
PasswordAuthentication yes
Then start the ssh daemon:
/sbin/sshd -f /etc/ssh/sshd_config
Now login over SSH, using the IP of the VM with username root and the password you set previously. You can start installing and configuring your custom software on the vm now.
Cleanup
Once everything has been set up to your liking and before shutting down the vm, check the following via the VM console:
- Default the sshd config
- Remove ssh key files from /etc/ssh/ ->
rm /etc/ssh/ssh_host_* - Remove the directory /run/sshd ->
rm -r /run/sshd - Enable all required systemd services ! This will start your service when the image boots ->
systemctl enable your-service - Check and enable the firewall ->
ufw statusornft list ruleset - Change root password -> as root run:
passwd - Clear bash history for root and other users (if created any):
vim /root/.bash_history. For root first logout out of the VM console, log back in and put a space in front of your text editor cmd (so it’s not stored in the bash history when you logout).
Upload image to the Hub
Once done shut down the temporary vm again. Ok good, so last thing is to package the image.
qemu-img convert -p -f qcow2 -O raw [your_image].img image.raw
tar -czf [name_of_release].tar.gz image.raw
Once you have the tar.gz upload this file to https://hub.grid.tf/
Once the Hub is ready doing it’s magic, you can find the uploaded image in your personal repo https://hub.grid.tf/your-username.3bot
Don’t hesitate to test these procedures, give comments or new ideas! We are all learning here so pretty sure we can improve. 

