

Dear Friends,
This post is intended for friends at Matic  . Both ThreeFold and Matic share common values and there is an enormous potential that can be exploited together, especially when it comes to leveraging ThreeFold’s peer to peer cloud network.
We will quickly demonstrate how to setup a Matic node on the ThreeFold Grid . The purpose here is to get people started. The configuration can be tweaked to perfection with other experts in the community.
What we will do ?
- Setup your 3bot
- Log in and create your Network
- Get your wallet loaded
- Deploy your Matic container
- Access your Matic container
- Verify your Matic deployment
Before you start, we have 2 networks publicly available
- Mainnet @ https://explorer.grid.tf
- Testnet @ https://explorer.testnet.grid.tf
Step 1 - Setup your 3bot
The 3bot has a virtual admin that gives you access to the ThreeFold Grid for your deployments (containers, virtual machines, S3 storage and so on). The manual provides detailed instructions on how to set up your 3bot.
If this part is done, rest should be extremely easy as management is done via web interface.
To access the virtual admin interface, in your browser use the following link,
http://YOUR_IP_HERE/admin
Step 2 - Log in and Create your Network for Deployment
From the previous step, http://YOUR_IP_HERE/admin
Log in here with your 3bot. Make sure you open the ThreeFold connect app first!
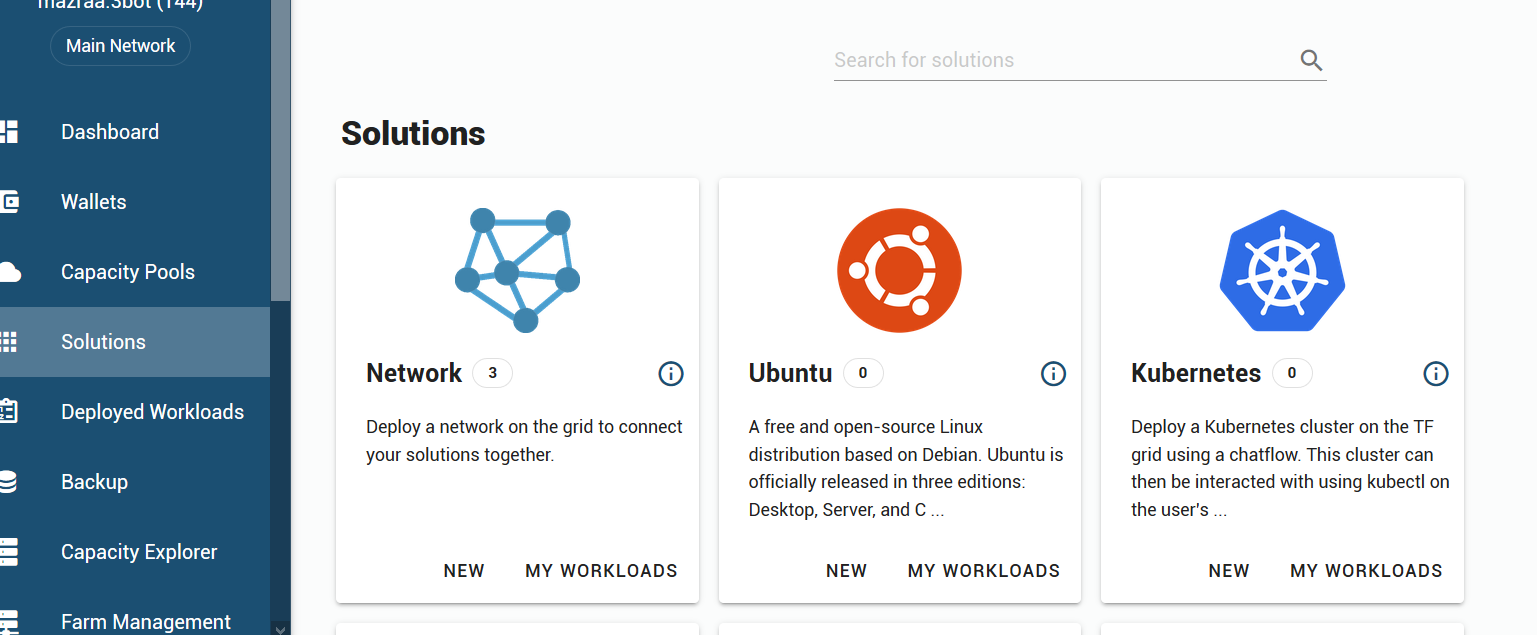
Once you log in, Go to Solutions and then go to Network . The interface is user-friendly and it should be easy. Few things to note,
- Use IPv4 network unless you are sure you have IPv6. You can test IPv6 connectivity here
- It is better to have the chat bot configure the network for you unless you have specific requirements
- The “Add Access” option is to add a grid node to be a part your network.
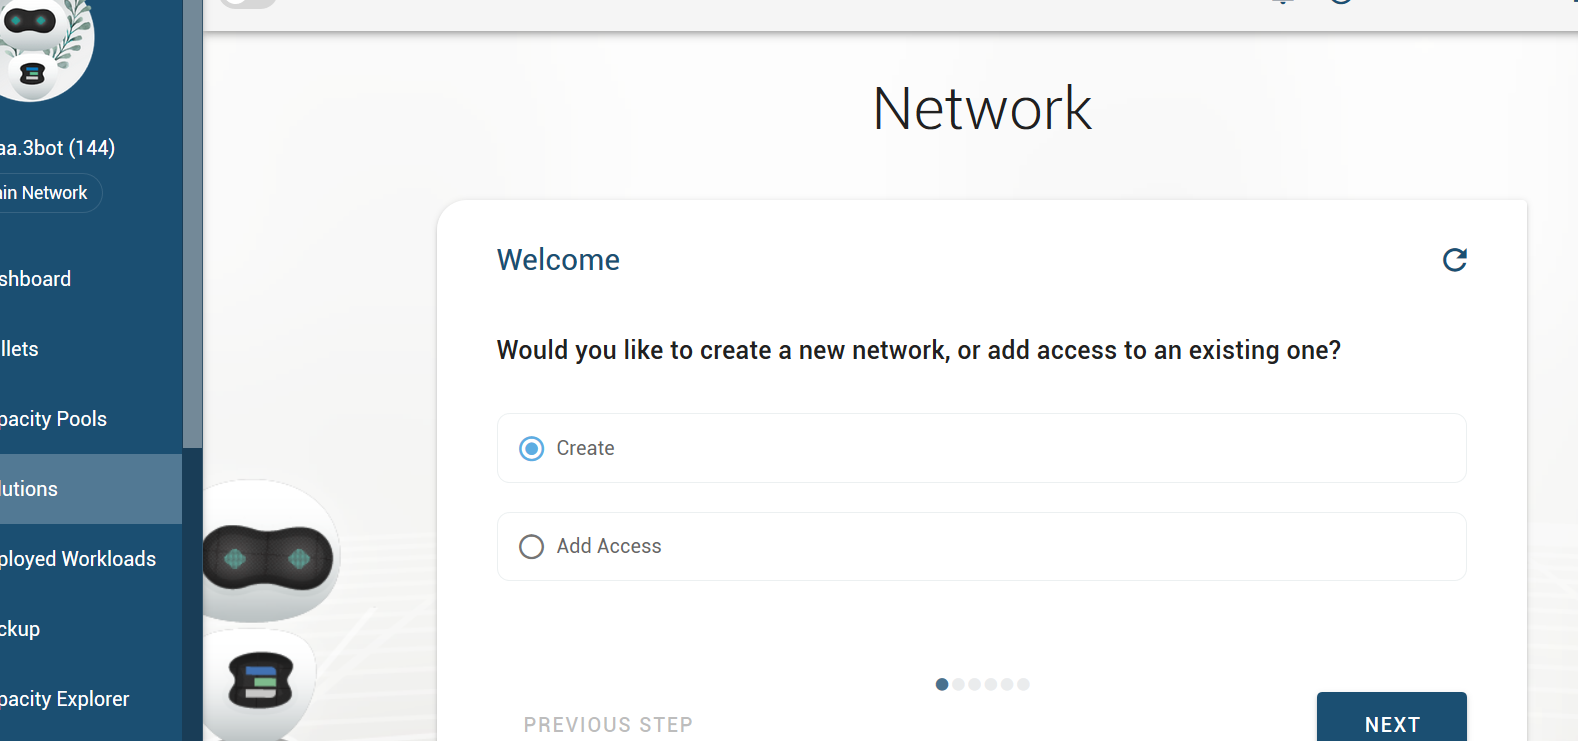
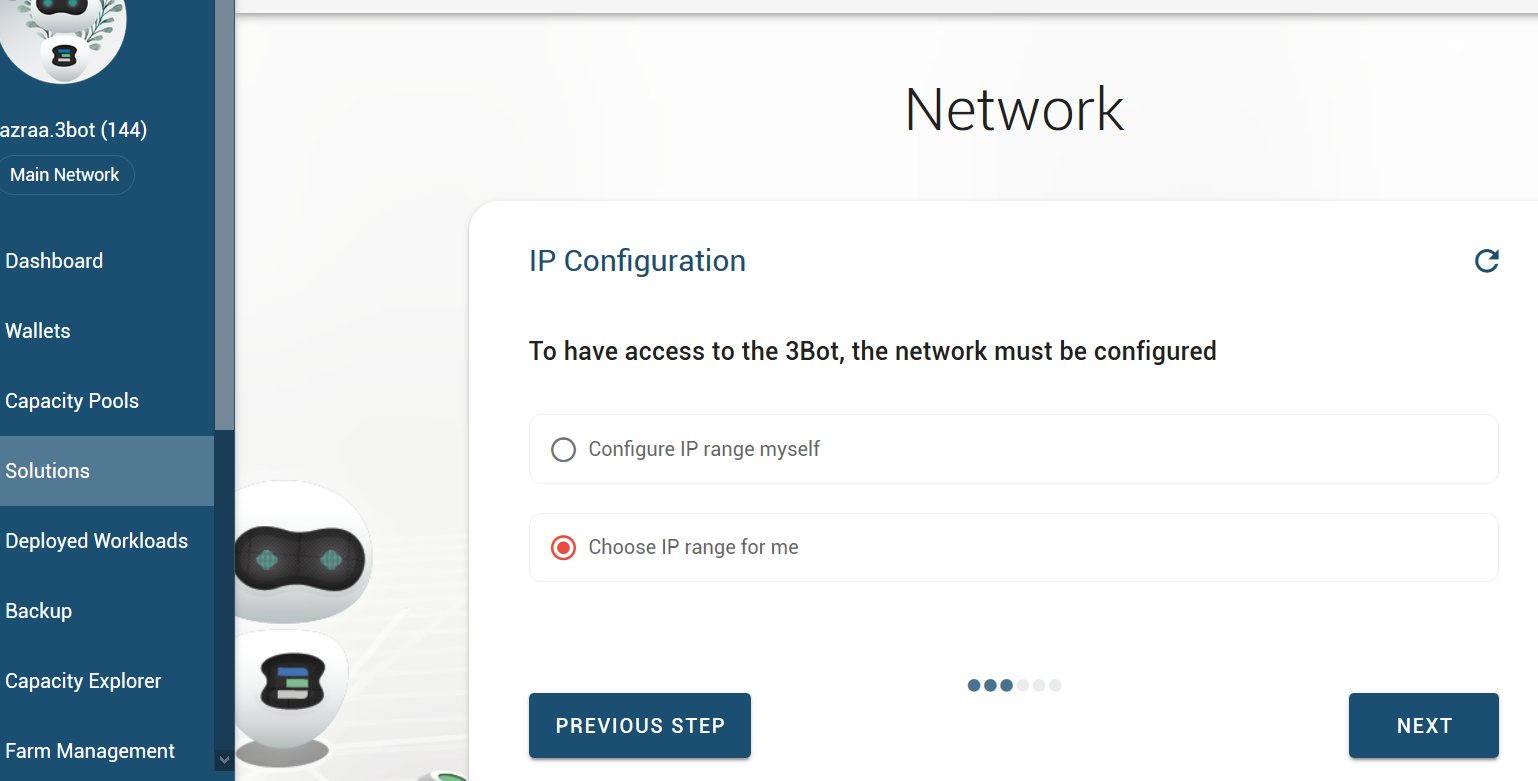
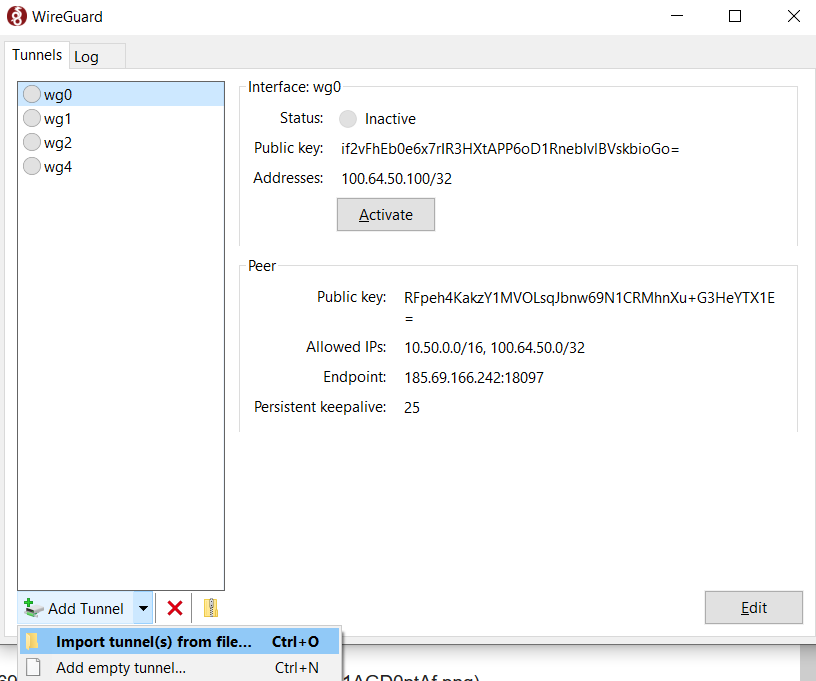
Note : The wizard will ask you to download your Wireguard configuration. This is important as you won’t be able to access your network without it. This serves as an entry point to your private network.

Step 3 : Get your wallet loaded with TFTs -
Buying TFTs should be simple. We suggest you to follow this link
You can load your wallet from the ThreeFold Connect App, create a new wallet or import an existing wallet to your 3bot admin. It is a totally a matter of choice. We recommend that you use the wallet ThreeFold Connect App.
You also have the option to create testnet funded wallet in case you are deploying on testnet.

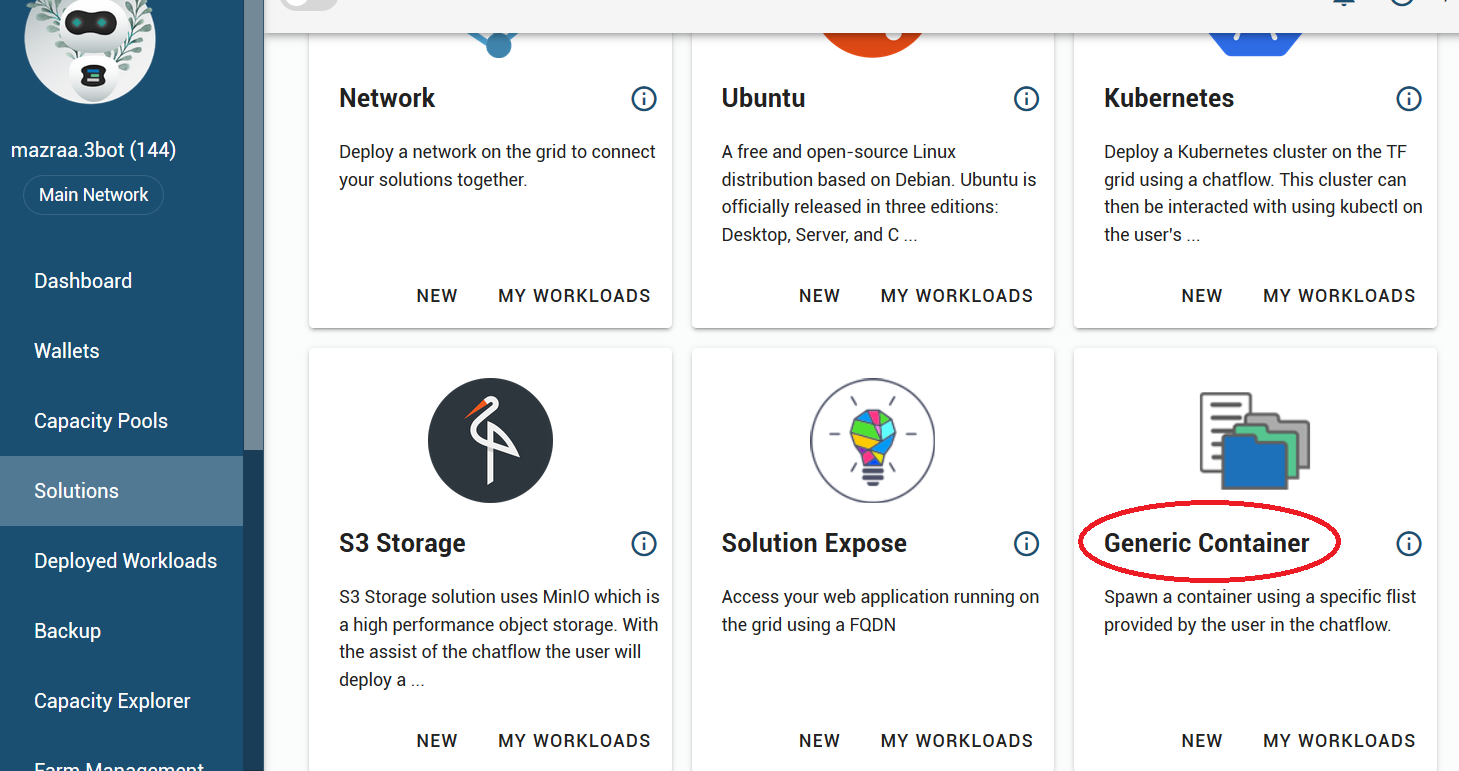
Step 4 - Create your Matic Container - Time to Rock’n Roll 
Under Solutions , go to Generic Container , the wizard will guide you accordingly.
- Select the network name which you created . Your container is going to be deployed in this network.
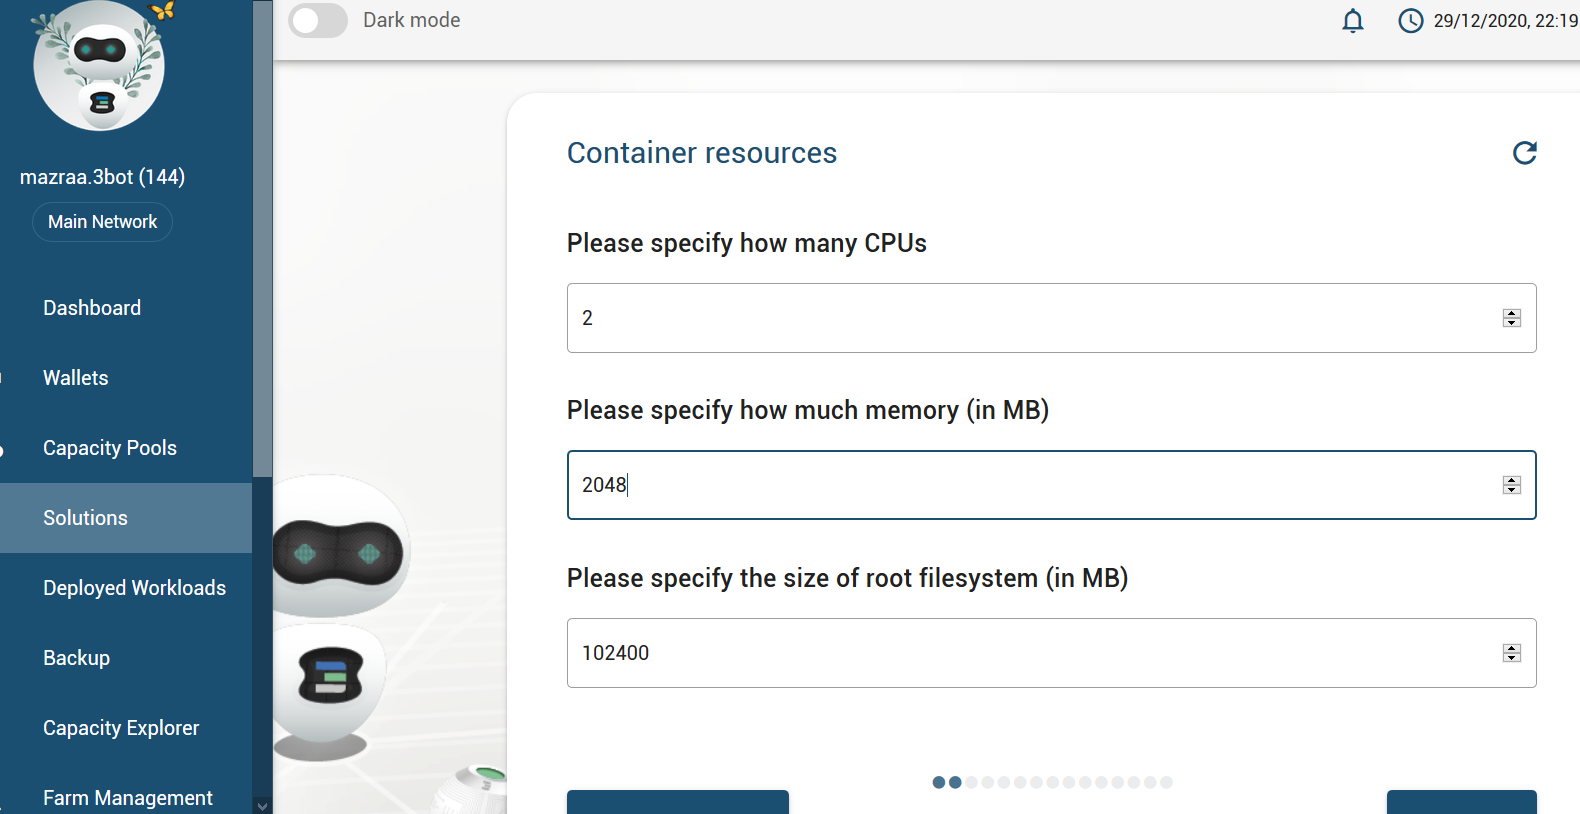
- Enter the container name, size in terms of CPU and memory . Ideally start with 2 CPUs and 2048 MB memory, since this is a full node.
- The flist link you have to use is => https://hub.grid.tf/arehman/v2-matic-1-3.flist
- Would you like access to your container through the web browser (coreX)? Select NO . You may want to use this for troubleshooting.
- Set the IP address from the drop down list you want to assign to your container.
- The container entry_point should be set to
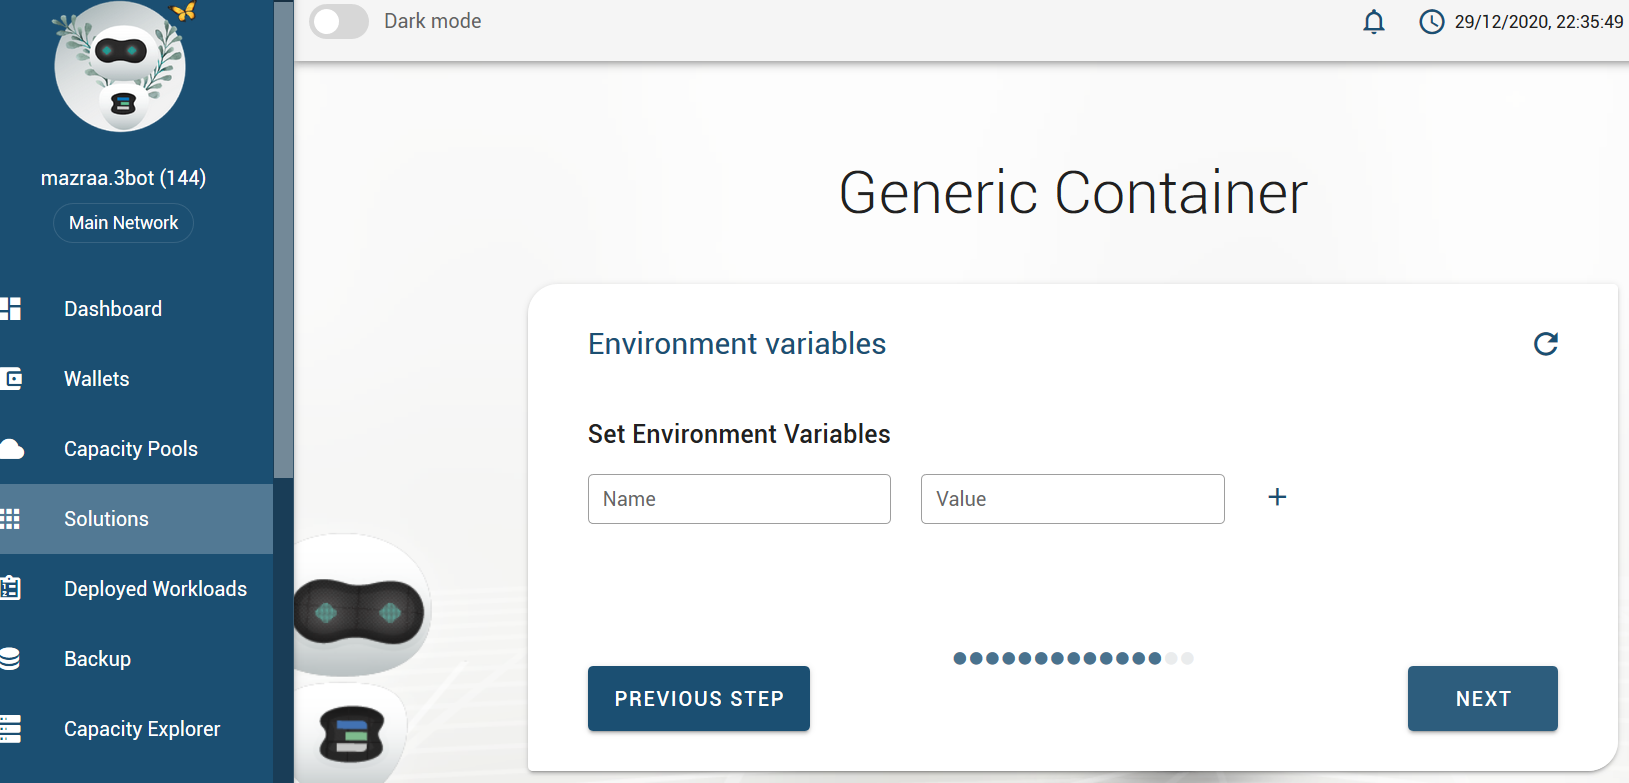
/start_matic.sh. - Under environment variables , use pub_key=your_public_key_here . This would allow to SSH into the container once it is deployed. NOTE : This should be an ed25519 public key. You can also log into the container with the default password with root user, “tfnow2020”
- You can skip the option to push container logs or set it to NO.
Define your machine size,
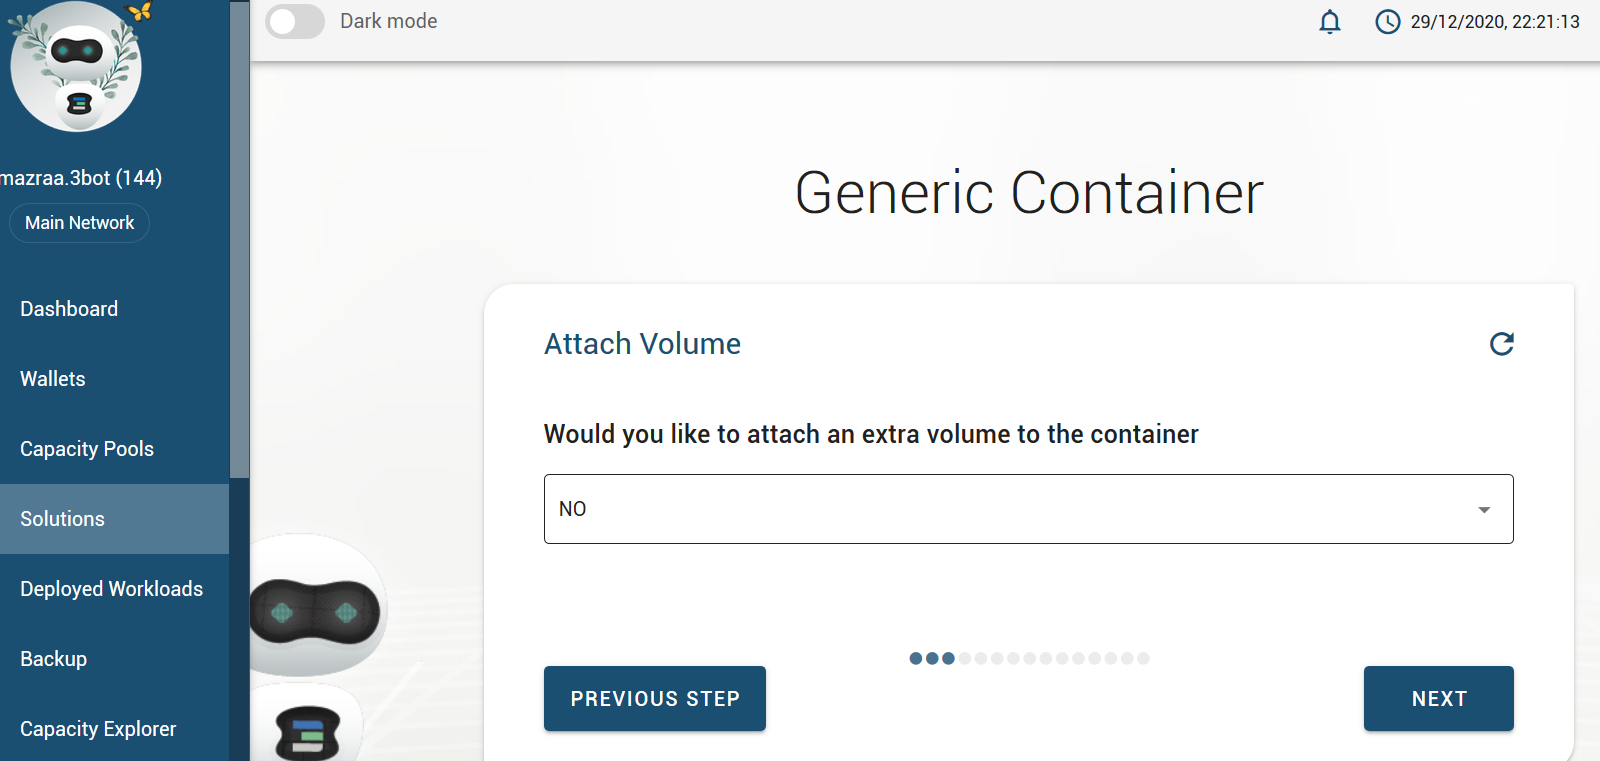
In case you want to attach a separate volume for persistence, make sure the mount point is set to /matic-data
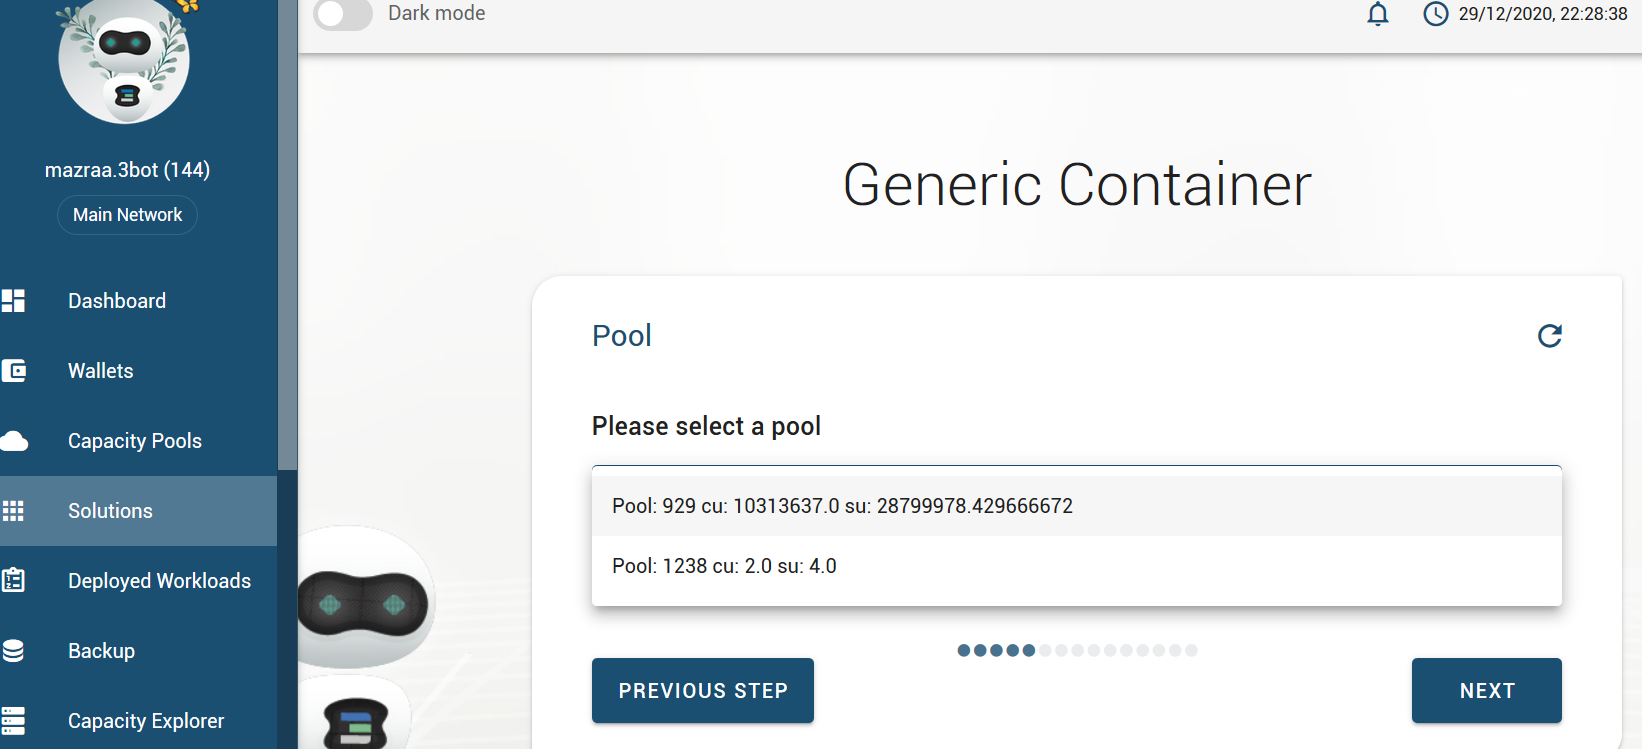
Please ensure to select the appropriate capacity pool for your deployment. To know about capacity pools, follow this link
Set the environment variables which should be the public ssh key,
If all goes well, you would be asked to pay through a QR code or choose from the wallets in the 3bot Admin.
Step 5 - Access your Matic Container
To access the container,
For Linux , wg-quick up path_to_wireguard_conf_file. For example, wg-quick up /my-wg/net-1.conf
For windows , Import the downloaded wireguard configuration from Step 2,
Once the wireguard tunnel is up, you can test connectivity by doing a ping test for your container IP address. Access the container with ssh using your private key.
ssh -i path_to_your_privatekey root@container_ip_address, For example ssh -i /opt/mysshkey root@172.20.10.5
The SSH public key should be provisioned during the container deployment.
NOTE : You can also log into the container with the default password with root user, "tfnow2020"
Please ensure to secure the container with your own settings.
Step 6 - Verify your Matic node Deployment
Once you have deployed, now go to Solutions and click "My Workloads",
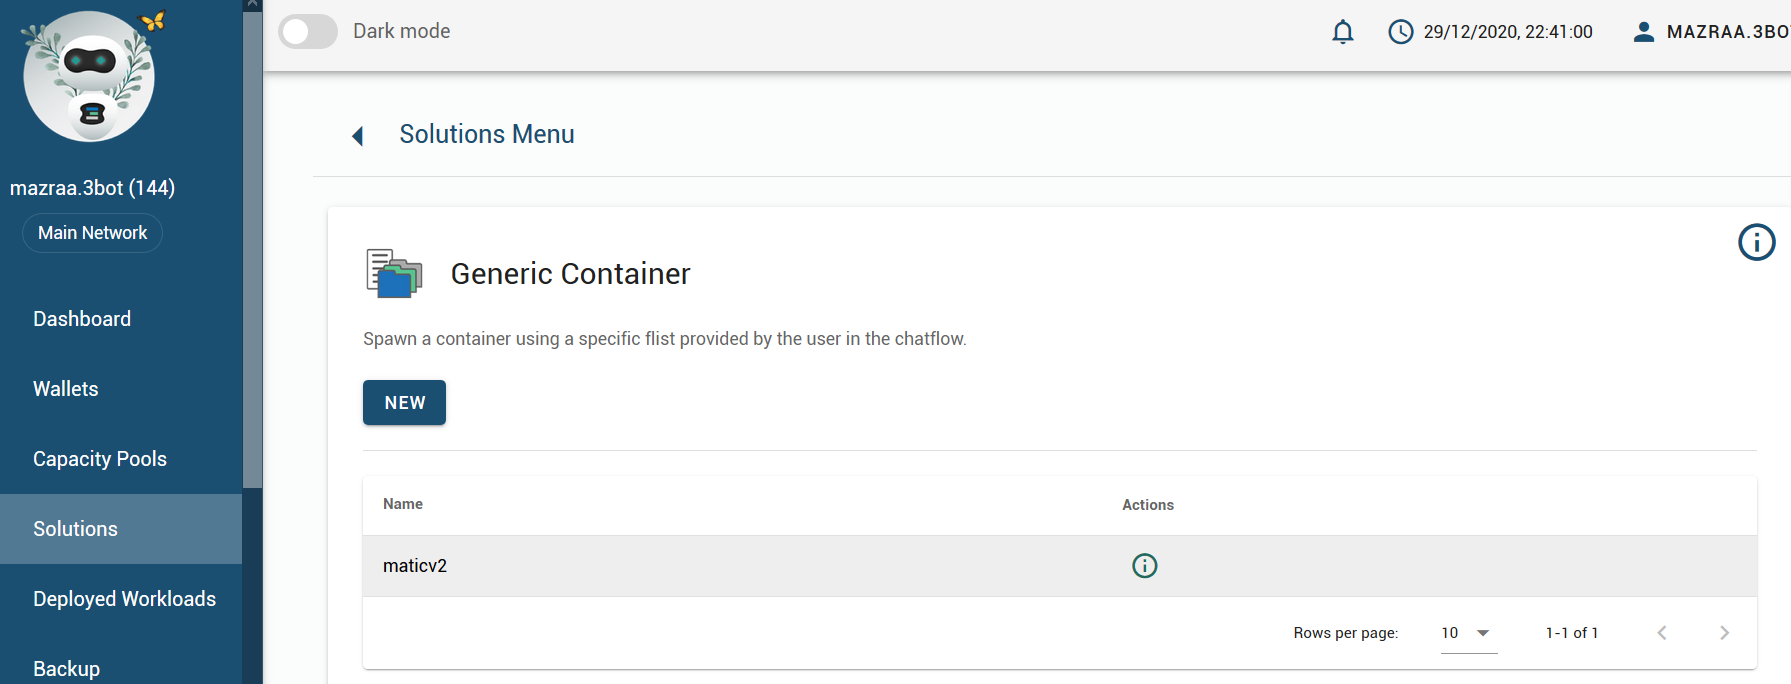
You can click the container name here to see details, Here is a view of it,
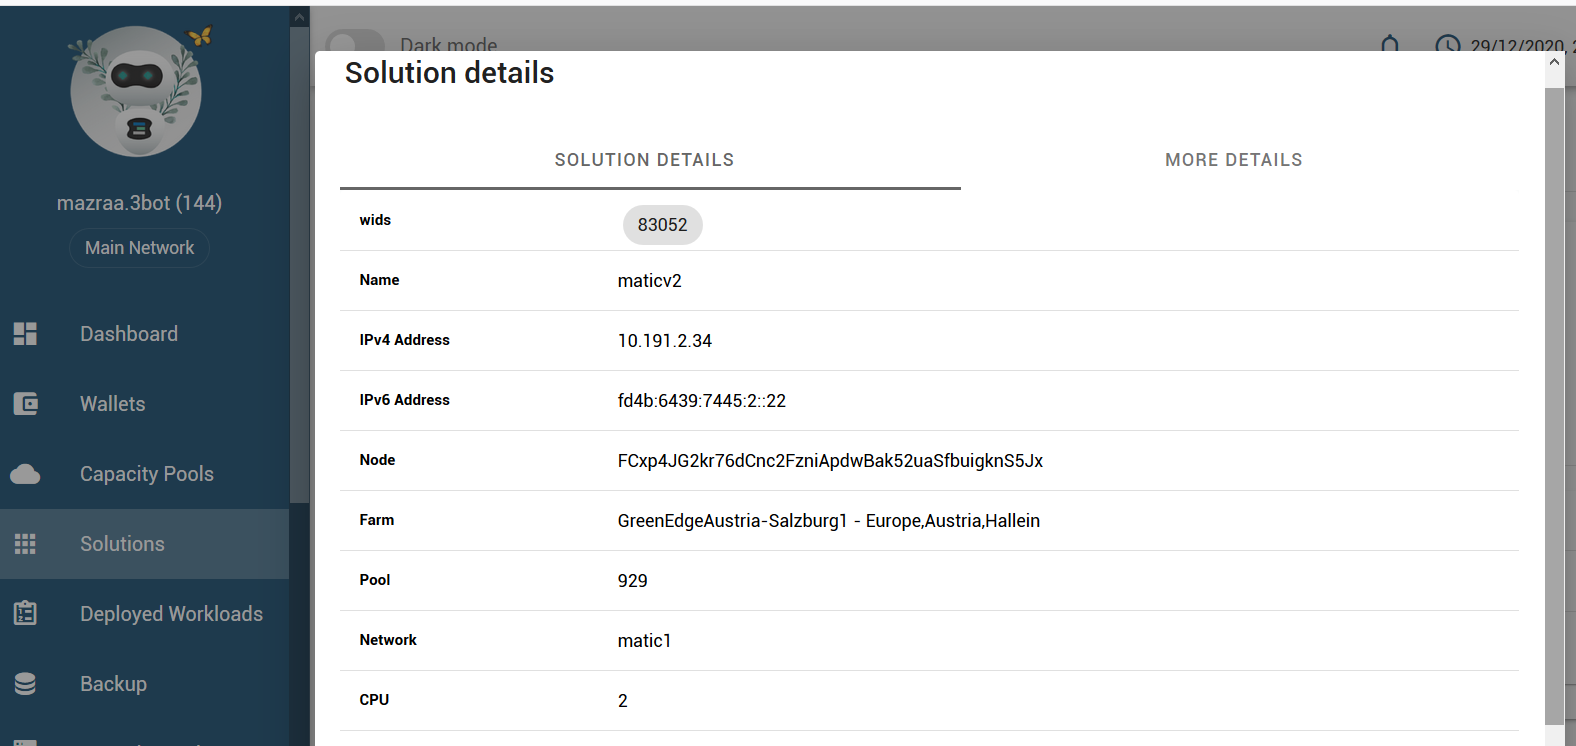
Once you log in, you should see the screen below,
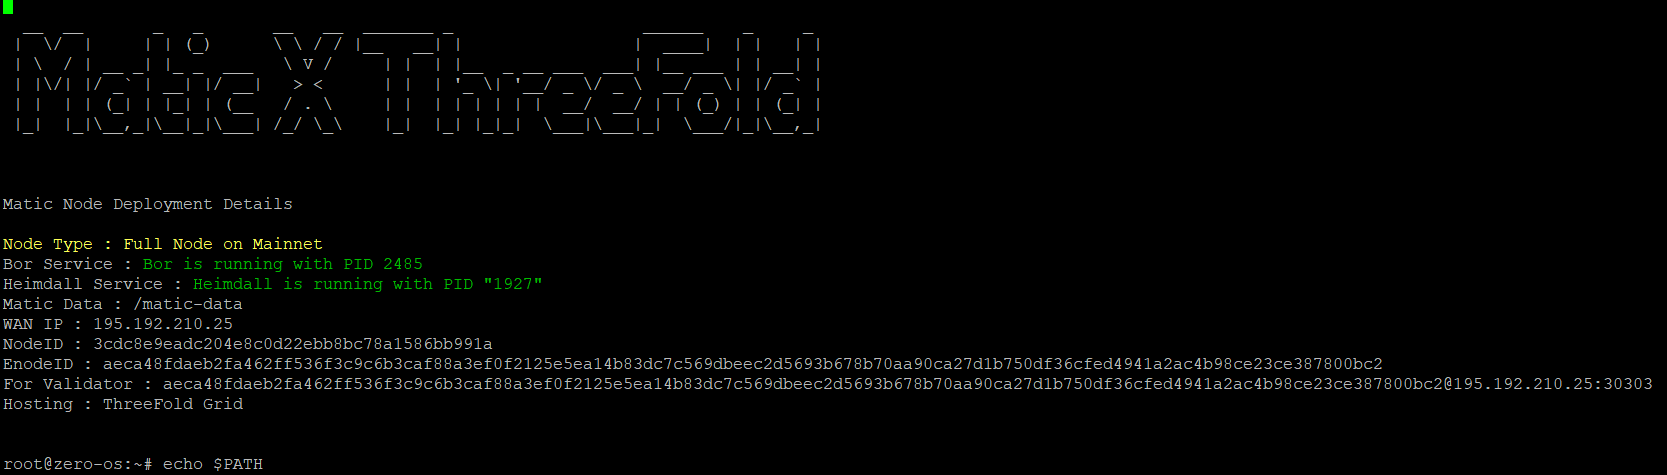
Inside the container, do a ps -ef , you should see the matic daemon / bor running,
root@zero-os:~# ps -ef
UID        PID  PPID  C STIME TTY          TIME CMD
root         1     0  0 10:01 ?        00:00:00 /usr/sbin/sshd -D
rabbitmq   249     1  0 10:01 ?        00:00:00 /usr/lib/erlang/erts-10.2.4/bin/epmd -daemon
root      2167     1 99 10:02 ?        11:13:15 heimdalld start --home /matic-data/heimdalld
root      2176     1  0 10:02 ?        00:00:53 heimdalld rest-server --home /matic-data/heimdalld
root      2476     1 11 10:02 ?        01:02:50 /go/bin/bor --datadir /matic-data/bor/data --port 30303 --http --http.addr 0.0.0.0 --http.vhosts * --http.corsdomain * --http.port 8545 --ipc
root      2668     1  0 10:02 ?        00:00:00 sshd: root@pts/0
root      2672  2668  0 10:02 pts/0    00:00:00 -bash
root      2755  2672  0 19:08 pts/0    00:00:00 ps -ef
You should be able to see bor and heimdalld processes running,
root@zero-os:~# netstat -lntpe
Active Internet connections (only servers)
Proto Recv-Q Send-Q Local Address           Foreign Address         State       User       Inode      PID/Program name
tcp        0      0 127.0.0.1:26657         0.0.0.0:*               LISTEN      0          288525351  2167/heimdalld
tcp        0      0 127.0.0.1:6060          0.0.0.0:*               LISTEN      0          288508446  2167/heimdalld
tcp        0      0 0.0.0.0:4369            0.0.0.0:*               LISTEN      103        288521231  -
tcp        0      0 0.0.0.0:22              0.0.0.0:*               LISTEN      0          288467733  1/sshd
tcp6       0      0 :::30303                :::*                    LISTEN      0          288526410  2476/bor
tcp6       0      0 :::7071                 :::*                    LISTEN      0          288495389  2476/bor
tcp6       0      0 :::26656                :::*                    LISTEN      0          288525355  2167/heimdalld
tcp6       0      0 :::8545                 :::*                    LISTEN      0          288526417  2476/bor
tcp6       0      0 :::26660                :::*                    LISTEN      0          288506630  2167/heimdalld
tcp6       0      0 :::1317                 :::*                    LISTEN      0          288508441  2176/heimdalld
tcp6       0      0 :::4369                 :::*                    LISTEN      103        288521232  -
tcp6       0      0 :::22                   :::*                    LISTEN      0          288467735  1/sshd
The data directory is /matic-data. If you attach a persistent volume to the container, this should serve as the mount point to it.
root@zero-os:/matic-data# tree -dh
.
├── [   8]  bor
│   └── [  22]  data
│       ├── [ 146]  bor
│       │   ├── [  14]  DATA_DIR
│       │   ├── [1.1K]  chaindata
│       │   │   └── [ 390]  ancient
│       │   ├── [  78]  lightchaindata
│       │   ├── [  98]  nodes
│       │   └── [  44]  triecache
│       └── [   0]  keystore
└── [  28]  heimdalld
    ├── [ 200]  config
    ├── [ 164]  data
    │   ├── [1.0K]  application.db
    │   ├── [ 13K]  blockstore.db
    │   ├── [  78]  evidence.db
    │   ├── [ 438]  state.db
    │   └── [ 138]  tx_index.db
    └── [ 116]  logs

19 directories
If you do, tail -f /matic-data/heimdalld/logs/heimdalld.log, you will logs for data sync,
root@zero-os:/matic-data# tail -f /matic-data/heimdalld/logs/heimdalld.log
I[2020-12-29|19:12:36.990] Committed state                              module=state height=510074 txs=0 appHash=230795A8692340331D652FA390AAE52996C9B97D01F1A7B83CD2918F7624EE75
I[2020-12-29|19:12:36.996] Executed block                               module=state height=510075 validTxs=0 invalidTxs=0
I[2020-12-29|19:12:37.070] Committed state                              module=state height=510075 txs=0 appHash=230795A8692340331D652FA390AAE52996C9B97D01F1A7B83CD2918F7624EE75
I[2020-12-29|19:12:37.076] Executed block                               module=state height=510076 validTxs=0 invalidTxs=0
I[2020-12-29|19:12:37.149] Committed state                              module=state height=510076 txs=0 appHash=230795A8692340331D652FA390AAE52996C9B97D01F1A7B83CD2918F7624EE75
I[2020-12-29|19:12:37.155] Executed block                               module=state height=510077 validTxs=0 invalidTxs=0
I[2020-12-29|19:12:37.274] Committed state                              module=state height=510077 txs=0 appHash=230795A8692340331D652FA390AAE52996C9B97D01F1A7B83CD2918F7624EE75
I[2020-12-29|19:12:37.283] Executed block                               module=state height=510078 validTxs=0 invalidTxs=0
I[2020-12-29|19:12:37.402] Committed state                              module=state height=510078 txs=0 appHash=230795A8692340331D652FA390AAE52996C9B97D01F1A7B83CD2918F7624EE75
I[2020-12-29|19:12:37.407] Executed block                               module=state height=510079 validTxs=0 invalidTxs=0
I[2020-12-29|19:12:37.527] Committed state                              module=state height=510079 txs=0 appHash=230795A8692340331D652FA390AAE52996C9B97D01F1A7B83CD2918F7624EE75
I[2020-12-29|19:12:37.532] Executed block                               module=state height=510080 validTxs=0 invalidTxs=0
I[2020-12-29|19:12:37.607] Committed state                              module=state height=510080 txs=0 appHash=230795A8692340331D652FA390AAE52996C9B97D01F1A7B83CD2918F7624EE75
I[2020-12-29|19:12:37.613] Executed block                               module=state height=510081 validTxs=0 invalidTxs=0
I[2020-12-29|19:12:37.686] Committed state                              module=state height=510081 txs=0 appHash=230795A8692340331D652FA390AAE52996C9B97D01F1A7B83CD2918F7624EE75
I[2020-12-29|19:12:37.692] Executed block                               module=state height=510082 validTxs=0 invalidTxs=0
I[2020-12-29|19:12:37.765] Committed state                              module=state height=510082 txs=0 appHash=230795A8692340331D652FA390AAE52996C9B97D01F1A7B83CD2918F7624EE75
I[2020-12-29|19:12:37.774] Executed block                               module=state height=510083 validTxs=0 invalidTxs=0
That should be pretty much ! . We have a matic full node running. Once the node syncs, you can update keys / wallets as per your requirements. This should get you started !
Sources


 :
: